 CrawlLama
![]()
| 📚 Documentation | 🚀 Quickstart | 🔌 API Guide | 🤖 Adaptive Hops | 🔒 Security | 📝 Changelog |
Production-Ready AI Research Agent with OSINT & Multi-Hop Reasoning <div align=”left>
CrawlLama
Current Version: 1.4.6 – Security Fixes </div>
🤝 Contribute to CrawlLama!
We welcome your ideas, bug reports, and feature requests!
📖 Table of Contents
A fully local, production-ready AI system with advanced intelligence features:
- 🔍 OSINT Module - Email/Phone/IP Intelligence, Social Media Analysis, Advanced Search Operators
- 🧠 Multi-Hop Reasoning with LangGraph for complex queries
- 🤖 Adaptive Agent Hopping - Intelligent agent selection based on query complexity (LOW/MID/HIGH)
- 🚀 REST API with FastAPI for integration
- 🔌 Plugin System for easy extensibility
- ⚡ Performance Optimizations (16k context for RTX 3080, Async, Parallelization)
✨ Features
🎯 Core Features
- 🤖 Adaptive Agent Hopping System – Automatic agent selection based on query complexity (LOW/MID/HIGH), confidence-based escalation, and resource-aware adaptation (NEW v1.4.4)
- 🛠️ UI Settings for Adaptive Report – Toggle the Adaptive Intelligence Report directly from the interactive settings menu (NEW v1.4.4)
- 🧠 Multi-Hop Reasoning – LangGraph-based agent with 6-node workflow (Router → Search → Analyze → Follow-Up → Synthesize → Critique)
- 🔄 Restart Command – Restart agent without exiting the program
- 🔄 Parallelization – Multi-aspect searches with ThreadPoolExecutor
- ⚡ Performance Optimizations – 16k context for RTX 3080, Async, Parallelization
- 🌐 Multi-Source Web Search – DuckDuckGo, Brave Search, Serper API with fallback
- 📚 Wikipedia Integration – Dedicated Wikipedia search (German/English)
- 🧠 Advanced RAG System – Batch processing, multi-query, hybrid search (RAG Analysis)
- 💾 Intelligent Caching – TTL-based with hash keys, LRU eviction, configurable max size (500MB)
- 🎯 Tool Orchestration – Automatic tool selection via LLM
- ⚙️ Interactive Settings Menu – Live configuration of LLM, Search, RAG & OSINT
- 📊 Context Usage Tracker – Real-time token usage monitoring with tiktoken
- 🏥 Health Monitoring Dashboard – Interactive system monitoring with rich UI
- 🔌 Lazy-Loading – On-demand loading for tools and plugins
- 🌐 Async Operations – Parallel HTTP requests with aiohttp
- 📊 Resource Monitoring – RAM usage, performance tracking, auto garbage collection
- 🌐 FastAPI REST API – 8+ endpoints with auto-documentation (
/query,/plugins,/stats,/health) - 🔌 Plugin System – Dynamic loading/unloading of plugins
- 🎨 Enhanced CLI – Rich formatting, tables, trees, Markdown
- 🔧 Setup Scripts –
setup.bat,setup.shwith auto-configuration - 🌐 optional cloud llm support
🔍 OSINT Features
- 🔎 Advanced Search Operators –
site:,inurl:,intext:,filetype:,email:,phone:,ip: - 📧 Email Intelligence – Validation, MX records, disposable detection, variations
- 📱 Phone Intelligence – Validation, carrier lookup, country detection, formatting
- 💾 Persistent Memory Store – Survives
clearcommand, stores emails/phones/IPs/usernames/domains/notes - 🗑️ Memory Store CRUD – Full CRUD functionality with
forgetcommand - 🔄 Batch Processing – Analyze multiple emails/phones simultaneously with summary statistics
- 🌐 IP Intelligence – IPv4/IPv6 analysis, geolocation, ISP info, security reputation, VPN detection
- 👤 Social Intelligence – 12 platforms (GitHub, LinkedIn, Twitter, Instagram, Facebook, YouTube, Reddit, Pinterest, TikTok, Snapchat, Discord, Steam)
- 🤖 AI Query Enhancement – Query variations, operator suggestions, entity detection, auto-type detection
- ⚖️ Compliance Module – Rate limiting, terms of use, audit logging, robots.txt compliance
- 🛡️ Privacy Protection – No API keys required, ethical scraping, usage tracking
- 🔒 Safesearch Quality Filter – Configurable result quality (off/moderate/strict)
🔒 Security & Performance
- 🔧 Code Quality – Refactored, focused methods for better maintainability
- 🎯 Accurate Token Counting – tiktoken integration for precise token counting
- 🔄 Intelligent Retry Logic – Tenacity-based retries with exponential backoff
- ⏱️ Rate Limiting – 1 request/second + robots.txt checks
- 🛡️ Fallback System – Automatic fallbacks for API failures
- 🔐 Secure Config – Encrypted API key storage
- 🔍 Output Validation – Sanitization of LLM outputs
- ✅ Domain Blacklist – Protection against unwanted domains
- 📊 RTX 3080 Optimization – 16k context support (qwen3:8b), increased cache sizes
- 🖥️ Windows Console Compatibility – ASCII output and UTF-8 encoding for robust CLI experience (NEW v1.4.4)
- 🧹 Clear-All Command – Instantly reset session, cache, and memory from CLI (NEW v1.4.4)
-
🆕 Release Highlights v1.4.5 (2025-10-29) (Optional Cloud LLM)
☁️ Cloud LLM & Provider-Based Config:
- ✅ Cloud LLM Support - OpenAI (GPT-4/4o-mini), Anthropic (Claude 3), Groq + local Ollama
- ✅ Local fallback remains available for full offline operation.
- ✅ Smart Token Limits - Auto-adjust based on provider; local models high (16k), cloud conservative (~1.5k)
- ✅ MultiHop Agent - Truncates web content intelligently for cloud APIs
- ✅ Auto Config - Config file automatically generated from
config.json.exampleduring setup - ✅ Improved API interface for hybrid (local + cloud) inference pipelines.
- ✅ Updated documentation for cloud setup and API key management.
- ✅ Config file is now auto-generated from config.json.example during setup. (config.json change)
- 🛠️ Prevents context_length_exceeded & rate_limit_exceeded errors
🆕 Release Highlights v1.4.4 (2025-10-28)
🤖 Adaptive Agent Hopping System
- Automatic Complexity Detection – LLM + heuristics for LOW/MID/HIGH
- Intelligent Agent Selection – SearchAgent for simple, MultiHopAgent for complex queries
- Confidence-Based Escalation – Auto upgrade when confidence < 0.5
- Resource Monitoring – Dynamic load management
- 🛠️ Adaptive System – Powers CLI queries with agent selection & escalation
- Bug Fixes & Improvements – MultiHopAgent robustness, Windows console support
🆕 Release Highlights v1.4.3 (2025-10-27)
🌍 Complete English Translation:
- ✅ System Prompts - All AI prompts translated to English (agent, OSINT, multi-hop reasoning)
- ✅ UI Messages - All user-facing messages, errors, and help text
- ✅ GitHub Templates - Bug reports, feature requests, documentation issues, pull request templates
- ✅ Documentation - Docstrings, comments, and script descriptions
- ✅ 26 Files Updated - Comprehensive translation across entire codebase
- ✅ Functionality Preserved - German regex patterns and multilingual features maintained
🆕 Release Highlights v1.4.2 (2025-10-26)
Major Changes:
- 🗑️ Memory Store Deletion: Full CRUD functionality with
forgetcommand - 🔧 OSINT Parser Fixes: Memory operators now take precedence over standard operators
- 📱 Phone Pattern Fix: Phone numbers with extensions (e.g., 040-822268-0) are correctly parsed
- 🔄 Live Dashboard Updates: Memory Store panel updates in real-time
- 🚀 API Starter Scripts: New
run_api.bat/run_api.shfor quick FastAPI server startup
Forget Command Syntax:
forget email:test@example.com        # Delete specific email
forget phone:+491234567890           # Delete phone number
forget ip:192.168.1.1                # Delete IP address
forget username:johndoe              # Delete username
forget category:emails               # Delete all emails
forget category:phones               # Delete all phone numbers
forget all:true                      # Delete entire memory store
Start API Server:
# Windows
run_api.bat

# Linux/macOS
./run_api.sh

# Or manually
python app.py
Then open in browser: http://localhost:8000/docs
🏥 Health Monitoring Dashboard
The integrated health module offers a unified dashboard with two modes:
Usage:
# Windows
health-dashboard.bat

# Linux/macOS
./health-dashboard.sh

# Directly with Python (Interactive Menu)
python health-dashboard.py

# Directly to Live Monitor
python health-dashboard.py --monitor

# Directly to Test Dashboard
python health-dashboard.py --tests
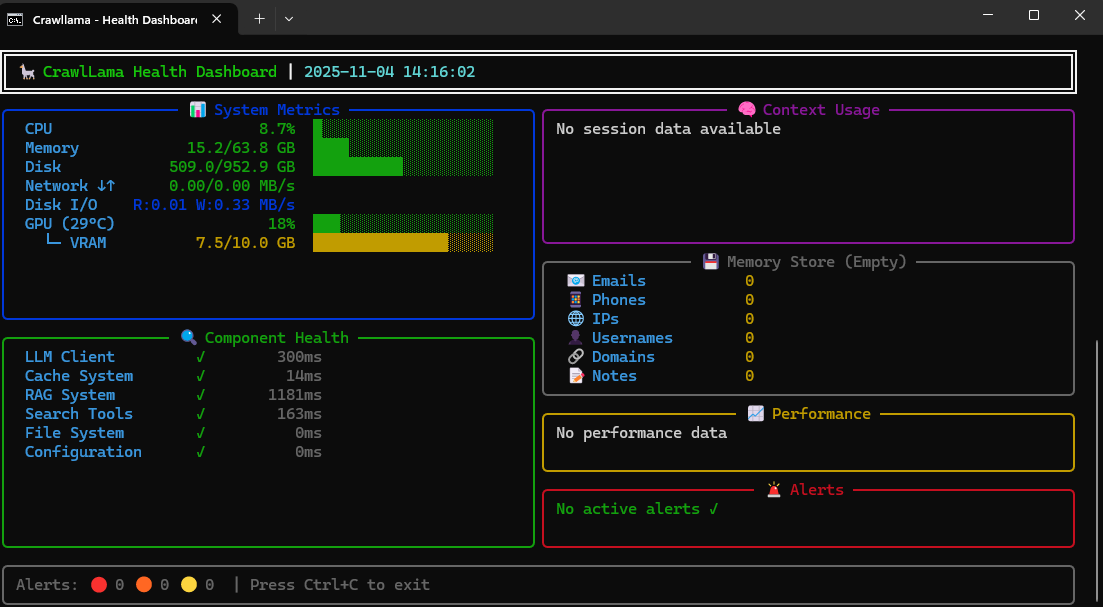
📊 Mode 1: Live System Monitor
Real-time monitoring with rich terminal UI:
- Live System Metrics - CPU, RAM, disk, network in real-time
- Component Health Checks - LLM, cache, RAG, tools automatically checked
- Performance Tracking - Response times, throughput, percentiles
- Alert System - Automatic warnings for threshold exceedances
- Rich Terminal UI - Color-coded status displays with live updates
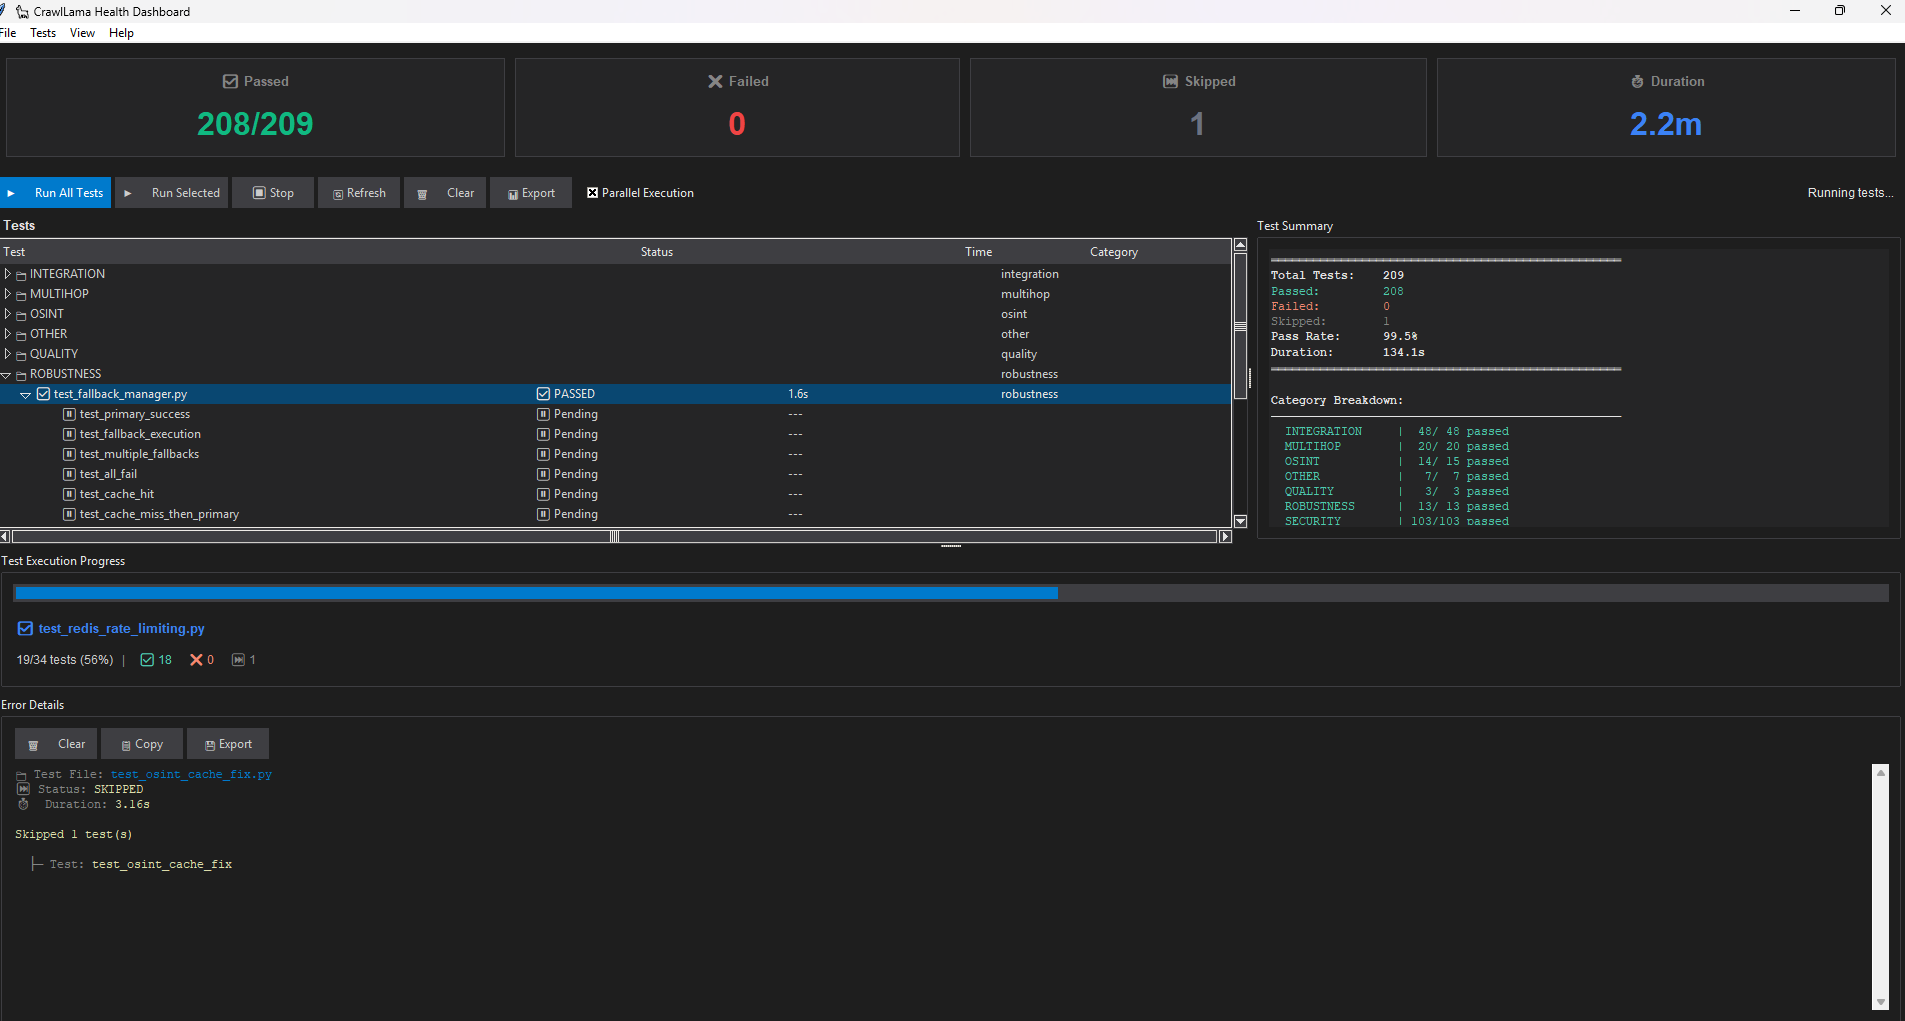
🧪 Mode 2: Test Dashboard (GUI)
Tkinter-based GUI for test management:
- ✅ Automatic test detection
- ✅ Run individual or all tests
- ✅ Real-time progress tracking
- ✅ Detailed error logs
- ✅ Export (JSON/HTML)
See: Health Monitoring Guide for details and programmatic usage
OSINT Usage:
# Email intelligence
email:test@example.com

# Phone intelligence
phone:"+49 151 12345678"

# IP intelligence
ip:8.8.8.8

# Batch processing (NEW in v1.4.1!)
email:test@example.com user@domain.com admin@site.com
phone:+491234567890 +441234567890 +331234567890

# Memory Store (NEW in v1.4.2!)
remember email:test@example.com      # Store email
recall emails                        # Retrieve all emails
forget email:test@example.com        # Delete specific email
forget category:emails               # Delete all emails
forget all:true                      # Delete entire memory store

# Advanced search
site:github.com inurl:python filetype:md

# Combined operators
email:john@example.com site:linkedin.com inurl:profile
| See: OSINT Usage Guide | OSINT Module README |
🔒 Security & Robustness
- ✅ Domain Blacklist - Protection against unwanted domains
- ⏱️ Rate Limiting - 1 request/second + robots.txt checks
- 🔄 Retry Logic - Exponential backoff with tenacity (NEW v1.3: also for LLM client)
- 🛡️ Fallback System - Automatic fallbacks for API failures
- 🔐 Secure Config - Encrypted API key storage
- 🔍 Output Validation - Sanitization of LLM outputs
- 💾 Smart Caching - LRU eviction at max_size_mb (NEW v1.3)
📸 Images
Health Dashboard - Live System Monitor
Real-time monitoring with rich terminal UI displaying system metrics, component health, and performance tracking.
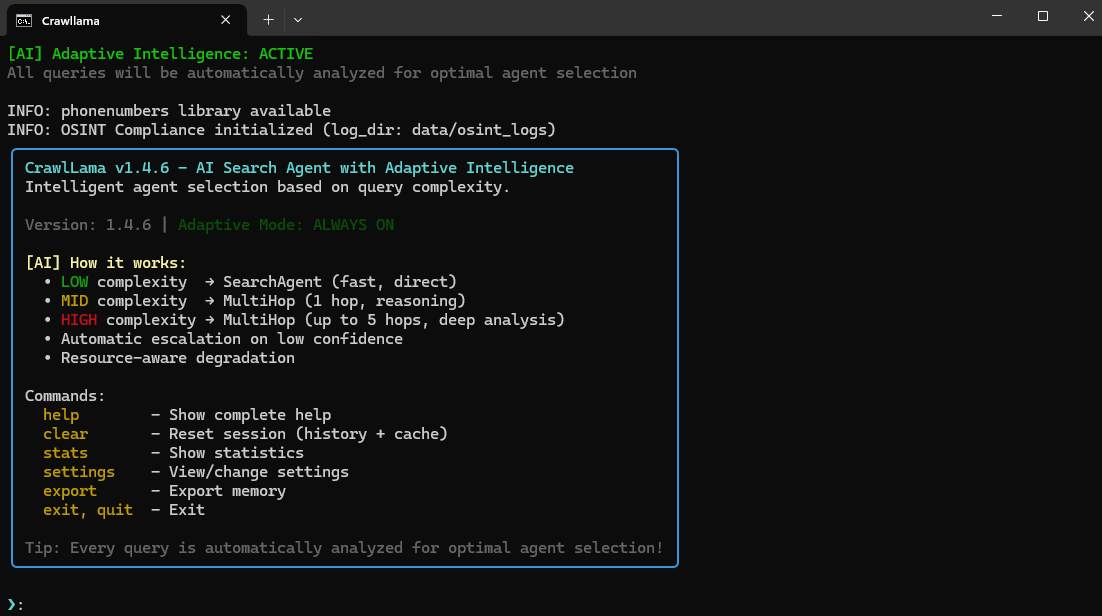
Interactive CLI Interface
CrawlLama’s adaptive intelligence system with automatic agent selection and interactive commands.
Test Dashboard GUI
Tkinter-based test management interface with automatic test detection and real-time progress tracking.
🚀 Quickstart
📦 Downloads
Pre-built Releases (recommended for quick start):
| Version | Download | VirusTotal Check |
|---|---|---|
| v1.4 Preview | Crawllama-1.4-preview.zip | 🔒 VirusTotal Scan |
✅ All downloads are virus-free - VirusTotal scans confirm no malware
📦 Plug & Play - Simply extract and start (Ollama + Python required)
📦 Installation
Windows:
- Download Crawllama-1.4-preview.zip
- Extract to any folder (e.g.,
C:\Crawllama) - Install Ollama from ollama.ai/download
- Start Ollama and load model:
ollama serve ollama pull qwen3:4b - In the Crawllama folder:
setup.bat
run.bat
Linux/macOS:
- Download and extract:
wget https://github.com/arn-c0de/Crawllama/releases/download/v.1.4_Preview/Crawllama-1.4-preview.zip unzip Crawllama-1.4-preview.zip cd Crawllama-1.4 - Install Ollama:
curl -fsSL https://ollama.ai/install.sh | sh ollama serve & ollama pull qwen3:4b - Setup and start:
chmod +x setup.sh run.sh
./setup.sh
./run.sh
Option 1: Setup Scripts (Recommended for Git Installation)
Windows:
setup.bat
Linux/macOS:
chmod +x setup.sh
./setup.sh
Note: After the initial setup, you must select at least one LLM model during setup. If a model is already installed, you can skip this step—otherwise, selection is required to avoid errors in the test program.
The setup script:
- ✅ Checks Python version (3.10+)
- ✅ Creates virtual environment
- ✅ Lets you select features and LLM models to install (core is always installed)
- ✅ Installs all selected dependencies
- ✅ Creates necessary directories
- ✅ Copies
.env.exampleto.env - ✅ Checks Ollama status
⚠️ Note for initial installation:
When running pip install -r requirements.txt for the first time within the newly created virtual environment, installing all dependencies—especially packages like torch, sentence-transformers, and scientific libraries—may take 5–10 minutes (or longer, depending on connection and hardware). Please wait until the process completes; afterward, the virtual environment is ready for use.
Note on disk space: After installation (including venv), the project typically requires about 1.2–1.5 GB of free disk space (v1.4: ~1.23 GB). This value may vary significantly depending on the operating system, Python packages (e.g., larger PyTorch/CUDA wheels), and additional models. Plan for ample additional space if storage is limited.
Model download sizes (approximate):
qwen3:4b— ~2–4 GB (depending on format/quantization)qwen3:8b— ~8–12 GBdeepseek-r1:8b— ~6–10 GBllama3:7b— ~6–9 GBmistral:7b— ~4–8 GBphi3:14b— ~12–20+ GB
Note: Model sizes vary significantly depending on the provider, format (FP16, INT8 quantization, etc.), and additional assets. Quantized models (e.g., INT8) can significantly reduce size, while FP32/FP16 or models with additional tokenizer/vocab files require more space. Plan for sufficient additional storage if using larger models or multiple models simultaneously.
Option 2: Manual Installation
Prerequisites:
- Python 3.10+ (python.org)
- Git (git-scm.com)
- Ollama (ollama.ai/download)
Windows - Step by Step:
# 1. Clone repository
git clone https://github.com/arn-c0de/Crawllama.git
cd Crawllama

# 2. Create virtual environment
python -m venv venv
venv\Scripts\activate

# 3. Install dependencies (takes 5-10 min)
pip install -r requirements.txt

# 4. Create directories
mkdir data\cache data\embeddings data\history logs plugins

# 5. Configuration
copy .env.example .env
notepad .env  # Optional: Add API keys

# 6. Start Ollama (separate terminal)
ollama serve

# 7. Load model (separate terminal)
ollama pull qwen3:4b

# 8. Start Crawllama
python main.py --interactive
Linux/macOS - Step by Step:
# 1. Clone repository
git clone https://github.com/arn-c0de/Crawllama.git
cd Crawllama

# 2. Create virtual environment
python3 -m venv venv
source venv/bin/activate

# 3. Install dependencies (takes 5-10 min)
pip install -r requirements.txt

# 4. Create directories
mkdir -p data/cache data/embeddings data/history logs plugins

# 5. Configuration
cp .env.example .env
nano .env  # Optional: Add API keys

# 6. Install and start Ollama
curl -fsSL https://ollama.ai/install.sh | sh
ollama serve &

# 7. Load model
ollama pull qwen3:4b

# 8. Start Crawllama
python main.py --interactive
Troubleshooting Installation:
| Problem | Solution |
|---|---|
python not found |
Install Python 3.10+: python.org |
pip install fails |
Run python -m pip install --upgrade pip |
ollama: command not found |
Install Ollama: ollama.ai/download |
Connection refused (Ollama) |
Start Ollama: ollama serve |
ModuleNotFoundError |
Activate virtual environment: venv\Scripts\activate (Win) or source venv/bin/activate (Linux) |
| Disk space full | Ensure at least 5 GB free for venv + model |
Option 3: Git Clone (Quick Installation)
# 1. Clone
git clone https://github.com/arn-c0de/Crawllama.git
cd Crawllama

# 2. Virtual Environment
python -m venv venv
source venv/bin/activate  # Linux/macOS
venv\Scripts\activate     # Windows

# 3. Dependencies
pip install -r requirements.txt

# 4. Directories
mkdir -p data/cache data/embeddings data/history logs plugins

# 5. Config
cp .env.example .env
Ollama Setup
# Install Ollama
curl -fsSL https://ollama.ai/install.sh | sh  # Linux/macOS
# or from https://ollama.ai/download           # Windows

# Start Ollama
ollama serve

# Load model
ollama pull qwen3:4b
# Alternative: deepseek-r1:8b, llama3:7b, mistral
💡 Usage
Note:
The first start may take significantly longer than subsequent starts!
Initialization, dependency installation, and model downloads may take several minutes, depending on hardware and internet connection.
After the first successful start, all subsequent starts are significantly faster.
1. CLI - Interactive Mode
python main.py --interactive

# Or with setup script
run.bat           # Windows
./run.sh          # Linux/macOS
╭──────────────────────────────────────────────────────────────╮
│ CrawlLama - Local Search and Response Agent                  │
│ Commands:                                                    │
│   clear       - Reset session (history + cache)              │
│   clear-cache - Clear cache only                             │
│   save        - Manually save session                        │
│   load        - Reload session                               │
│   stats       - Display statistics                           │
│   status      - Show context usage                           │
│   settings    - Show/edit settings                           │
│   restart     - Restart agent (reload config)                │
│   exit, quit  - Exit                                         │
╰──────────────────────────────────────────────────────────────╯

❯ What is Machine Learning?
New Commands:
status- Shows token usage and available context capacity❯ status Context Usage Tracker ┏━━━━━━━━━━━━━━━━━━━┳━━━━━━━━━━━┳━━━━━━━━━━━┓ ┃ Source ┃ Tokens ┃ Share ┃ ┡━━━━━━━━━━━━━━━━━━━╇━━━━━━━━━━━╇━━━━━━━━━━━┩ │ Conversation │ 850 │ 8.5% │ │ Search Results │ 320 │ 3.2% │ │ Total Used │ 1,170 │ 11.7% │ │ Available │ 8,830 │ 88.3% │ │ Maximum │ 10,000 │ 100% │ └───────────────────┴───────────┴───────────┘settings- Interactive configuration editor❯ settings Displays all settings and allows: • Category selection (llm, search, rag, cache, osint, all) • Change LLM model (qwen3:8b, deepseek-r1:8b, etc.) • Adjust temperature (0.0-1.0) • Configure max tokens (now 16,000 for RTX 3080+) • Change search region (de-de, us-en, wt-wt) • Configure OSINT max results & rate limits • Enable/disable RAG • Enable/disable cache • Save changes directly to config.json • Auto-restart after saving (optional)restart- Restart agent❯ restart • Reloads config.json • Fully reinitializes agent • Optional session preservation • No session interruption
2. Health Monitoring Dashboard
# Windows
health-dashboard.bat

# Linux/macOS
python health-dashboard.py
The dashboard displays:
- ✅ System health (CPU, RAM, disk, network)
- ✅ Component status (LLM, cache, RAG, tools)
- ✅ Performance metrics (response times)
- ✅ Error log (last 10 errors)
- ✅ Auto-refresh (every 5 seconds)
Interactive commands:
r- Refresh (manual)c- Clear error logt- Run component testsq- Quit
3. How does intelligent search work?
The agent automatically decides when and how to search:
🤖 Automatic Decision
❯ Who is the current German Chancellor?

1. LLM analyzes: "Requires current info" ✓
2. Agent performs web search
3. LLM processes search results
4. Agent delivers up-to-date response
🔍 Search Operators for Targeted Searches
OSINT Search Operators:
# Domain-specific search
❯ site:github.com machine learning

# Email Intelligence
❯ email:john.doe@company.com

# Phone Intelligence
❯ phone:"+49 151 12345678"

# IP Intelligence (NEW!)
❯ ip:8.8.8.8
❯ 192.168.1.1  # Auto-detects as IP

# Social Media Intelligence (12 Platforms)
❯ username:elonmusk
❯ @microsoft
❯ github  # Auto-detects as username

# File format search
❯ site:example.com filetype:pdf

# URL filter
❯ inurl:documentation python

# Text in content
❯ intext:"contact email" site:example.com
Combined Searches:
# Multiple operators
❯ site:linkedin.com inurl:profile "software engineer"

# Exclusion with minus
❯ python programming -java

# OR conjunction
❯ site:github.com OR site:gitlab.com "machine learning"
See OSINT Usage Guide for all features.
4. CLI - Direct Queries
# Standard query (agent decides automatically if web search is needed)
python main.py "What is Python?"

# Multi-Hop Reasoning (for complex queries)
python main.py --multihop "Compare Python and JavaScript for web development"

# Offline mode (no web search, only LLM knowledge)
python main.py --no-web "Explain photosynthesis"

# OSINT search with search operators
python main.py "site:github.com python projects"
python main.py "email:contact@example.com"

# With specific model
python main.py --model llama3:7b "Who discovered Einstein?"
5. FastAPI Server
# Start server
python app.py

# Or with starter scripts
run_api.bat      # Windows
./run_api.sh     # Linux/macOS

# Or manually
uvicorn app:app --host 0.0.0.0 --port 8000
API Documentation: http://localhost:8000/docs
Available Endpoints:
Query & Reasoning:
POST /query- Execute standard or multi-hop queriesPOST /osint/query- OSINT queries with operators (email:, phone:, ip:, etc.)
Memory Store (CRUD):
GET /memory- Retrieve all stored entriesPOST /memory/remember- Store value (email, phone, ip, username, domain, note)GET /memory/recall/{category}- Retrieve category (emails, phones, ips, etc.)DELETE /memory/forget- Delete individual values, categories, or everythingGET /memory/stats- Memory store statistics
Session Management:
POST /session/clear- Reset sessionPOST /session/save- Save sessionPOST /session/load- Load session
Cache:
POST /cache/clear- Clear cacheGET /cache/stats- Cache statistics
Configuration:
GET /config- Retrieve current configurationPATCH /config- Modify configuration (llm, search, rag, cache, osint)GET /context/status- Token usage & context status
Plugins & Tools:
GET /plugins- List available pluginsPOST /plugins/{name}/load- Load pluginPOST /plugins/{name}/unload- Unload pluginGET /tools- List available tools
System:
GET /health- Health check (agent, monitoring, components)GET /stats- System statistics (agent stats, resources, performance)GET /security-info- Security configuration (rate limits, features)
🔒 API Security (v1.4.2+):
The API is protected by default with multiple security features:
- ✅ API Key Authentication - X-API-Key header required
- ✅ Rate Limiting - 60 requests/minute (configurable)
- ✅ Input Validation - Pydantic-based validation
- ✅ Query Sanitization - Protection against injection attacks
- ✅ Request Logging - All requests are logged
- ✅ CORS Protection - Configurable origins
- ✅ Trusted Host Middleware - Host header validation
Setup:
# 1. Set API key in .env
CRAWLLAMA_API_KEY=your_secure_api_key_min_32_chars

# 2. For local development (without API key)
CRAWLLAMA_DEV_MODE=true

# 3. Adjust rate limit (optional)
RATE_LIMIT=100

# 4. Configure CORS origins (optional)
ALLOWED_ORIGINS=http://localhost:3000,http://localhost:8080
Usage with API Key:
# With API key header
curl -X POST http://localhost:8000/query \
  -H "Content-Type: application/json" \
  -H "X-API-Key: your_api_key_here" \
  -d '{"query": "test"}'

# Or in dev mode (without API key)
export CRAWLLAMA_DEV_MODE=true
python app.py
Example Requests:
# Standard query (agent uses web search automatically if needed)
curl -X POST http://localhost:8000/query \
  -H "Content-Type: application/json" \
  -d '{
    "query": "What is Machine Learning?",
    "use_multihop": false
  }'

# Multi-hop query (for complex analyses)
curl -X POST http://localhost:8000/query \
  -H "Content-Type: application/json" \
  -d '{
    "query": "Compare Python and JavaScript",
    "use_multihop": true,
    "max_hops": 3
  }'

# OSINT search with search operators
curl -X POST http://localhost:8000/query \
  -H "Content-Type: application/json" \
  -d '{
    "query": "site:github.com python machine-learning",
    "use_multihop": false
  }'

# Retrieve statistics
curl http://localhost:8000/stats

# List plugins
curl http://localhost:8000/plugins

# Load plugin
curl -X POST http://localhost:8000/plugins/example_plugin/load
📋 CLI Commands & Options
Basic Options
| Option | Description |
|——–|————–|
| --interactive | Interactive mode |
| --debug | Enable debug logging |
| --no-web | Offline mode (no web search) |
| --model MODEL | Choose Ollama model |
| --stats | Display system statistics |
| --clear-cache | Clear cache |
Advanced Options (v1.1)
| Option | Description |
|——–|————–|
| --multihop | Enable multi-hop reasoning |
| --max-hops N | Max reasoning steps (1-5) |
| --api | Start API server |
| --plugins | List available plugins |
| --load-plugin NAME | Load plugin |
| --help-extended | Show extended help |
| --examples | Show usage examples |
| --setup-keys | Securely set up API keys |
Interactive Commands
| Command | Description |
|——–|————–|
| exit, quit | Exit program |
| clear | Clear screen |
| stats | Display statistics |
| help | Show help |
🚀 REST API
CrawlLama provides a complete REST API for integration into custom applications.
Start API Server
Windows:
run_api.bat
Linux/macOS:
./run_api.sh
Or manually:
uvicorn app:app --host 0.0.0.0 --port 8000
Quickstart
1. Start API Server
run_api.bat
2. Open API Documentation
- Interactive Docs: http://localhost:8000/docs
- ReDoc: http://localhost:8000/redoc
3. Send Query
curl -X POST http://localhost:8000/query \
  -H "X-API-Key: your-key" \
  -H "Content-Type: application/json" \
  -d '{"query": "What is Python?", "use_tools": false}'
Key Endpoints
POST /query- Execute queries (with/without web search, multi-hop)GET /health- Health checkGET /stats- System statisticsPOST /memory/remember- Store data (OSINT)GET /memory/recall/{category}- Retrieve dataGET /plugins- Manage pluginsPOST /cache/clear- Clear cache
Authentication
Set API key in .env:
CRAWLLAMA_API_KEY=your-secret-key-here
Or for testing:
CRAWLLAMA_DEV_MODE=true
Full Documentation
📖 API Usage Guide - Complete API documentation with examples
🏗️ Project Structure
👉 The complete and up-to-date project structure can be found here: docs/development/PROJECT_STRUCTURE.md
⚙️ Configuration
config.json
{
  "llm": {
    "base_url": "http://127.0.0.1:11434",
    "model": "qwen3:8b",
    "temperature": 0.7,
    "max_tokens": 10000,
    "stream": true
  },
  "search": {
    "provider": "duckduckgo",
    "max_results": 5,
    "timeout": 10
  },
  "rag": {
    "enabled": true,
    "batch_size": 100,
    "max_workers": 4
  },
  "cache": {
    "enabled": true,
    "ttl_hours": 24,
    "max_size_mb": 500,
    "clear_on_startup": false
  },
  "osint": {
    "max_results": 20,
    "email_search_limit": 50,
    "phone_search_limit": 50,
    "general_osint_limit": 100
  },
  "multihop": {
    "enabled": true,
    "max_hops": 3,
    "confidence_threshold": 0.7,
    "enable_critique": true
  },
  "plugins": {
    "example_plugin": {
      "enabled": true
    }
  },
  "security": {
    "rate_limit": 1.0,
    "max_context_length": 8000,
    "check_robots_txt": true
  }
}
Recommended max_tokens Settings:
| GPU/Hardware | Recommended max_tokens | Model |
|---|---|---|
| RTX 3080+ (10GB+) | 10,000 - 16,000 | qwen3:8b, deepseek-r1:8b |
| RTX 3060/3070 (8GB) | 6,000 - 8,000 | qwen3:4b, llama3:7b |
| CPU Only | 2,000 - 4,000 | qwen3:4b |
💡 Tip: Use the status command to monitor your token usage in real-time!
.env (Optional)
# API Keys (optional)
BRAVE_API_KEY=your_brave_api_key
SERPER_API_KEY=your_serper_api_key

# Proxy (optional)
HTTP_PROXY=http://proxy:port
HTTPS_PROXY=https://proxy:port
🧪 Testing
# All tests
pytest tests/ -v

# With coverage
pytest --cov=core --cov=tools --cov=utils tests/

# Specific tests
pytest tests/test_multihop_reasoning.py -v
pytest tests/test_error_simulation.py -v

# With debug output
pytest tests/ -v --log-cli-level=INFO
🔌 Plugin Development
Creating a Simple Plugin
# plugins/my_plugin.py

from core.plugin_manager import Plugin, PluginMetadata

class MyPlugin(Plugin):
    def get_metadata(self) -> PluginMetadata:
        return PluginMetadata(
            name="MyPlugin",
            version="1.0.0",
            description="My custom plugin",
            author="Your Name",
            dependencies=[]
        )

    def get_tools(self):
        return [self.my_tool]

    def my_tool(self, input: str) -> str:
        return f"Processed: {input}"
See: Plugin Tutorial for details
🛠️ Technology Stack
Core
- LLM: Ollama (qwen3:4b, deepseek-r1:8b, llama3, mistral)
- Orchestration: LangGraph (Multi-Hop Reasoning)
- Web Search: duckduckgo-search, Brave API, Serper API
- RAG: ChromaDB + Sentence Transformers
Backend
- API: FastAPI + Uvicorn
- Database: SQLite (Sessions)
- Async: aiohttp, asyncio
- Monitoring: psutil
Utils
- HTML Parsing: BeautifulSoup4
- CLI: Rich (Formatting)
- Retry: Tenacity
- Security: cryptography
Development
- Tests: pytest, pytest-mock, pytest-cov
- CI/CD: GitHub Actions (planned)
📚 Documentation
User Guides
- 📖 Installation Guide - Detailed installation
- 🧠 LangGraph Guide - Multi-Hop Reasoning
- 🔌 Plugin Tutorial - Plugin development
- 🏥 Health Monitoring - System monitoring
Developer Docs
- 🏗️ Project Structure - Project overview
- 🔄 Release Process - Release workflow
- 🧪 Tests - See
tests/for examples
API Documentation
- Swagger UI: http://localhost:8000/docs
- ReDoc: http://localhost:8000/redoc
🌟 Roadmap
Phase 1: Core ✅ (Completed)
- ✅ Ollama integration
- ✅ Web search (DuckDuckGo)
- ✅ Tool orchestration
- ✅ Basic RAG & caching
- ✅ CLI with Rich
Phase 2: Robustness ✅ (Completed)
- ✅ Fallback system
- ✅ Retry logic with tenacity
- ✅ Rate limiting & robots.txt
- ✅ Domain blacklist
- ✅ Safe fetch with proxy support
- ✅ Multi-source web search
- ✅ Comprehensive tests (80%+ coverage)
Phase 3: Intelligence ✅ (Completed - v1.1)
- ✅ Multi-Hop Reasoning with LangGraph
- ✅ RAG optimizations (batch, multi-query, hybrid)
- ✅ Parallelization (ThreadPoolExecutor)
- ✅ Lazy-loading for tools/plugins
- ✅ Async HTTP operations
- ✅ RAM & performance monitoring
Phase 4: Production ✅ (Completed - v1.1)
- ✅ FastAPI REST API
- ✅ Multi-user support (SQLite)
- ✅ Plugin system
- ✅ Enhanced CLI
- ✅ Setup scripts (Windows/Linux)
- ✅ Systemd service
- ✅ Comprehensive documentation
Phase 5: Future 📅 (Planned)
- GUI (Streamlit/Gradio)
- GraphQL API
- Redis cache for production
- Kubernetes deployment
- Monitoring dashboard
- Multi-language support
- Voice interface
🤝 Contributing
Contributions are welcome!
Development Workflow:
- Fork the repository
- Create a feature branch (
git checkout -b feature/amazing-feature) - Commit your changes (
git commit -m 'Add amazing feature') - Push to the branch (
git push origin feature/amazing-feature) - Create a pull request
Coding Standards:
- PEP8 compliant
- Use type hints
- Docstrings for all functions
- Tests for new features
📊 Performance
Benchmarks (on i7-8700K, 32GB RAM)
| Operation | Average | Notes |
|---|---|---|
| Standard Query | 2-5s | Without web search |
| Query with Web Search | 5-10s | 3-5 results |
| Multi-Hop (3 Hops) | 15-30s | Complex |
| RAG Search | <1s | 5 results |
| API Request | <100ms | Without tools |
Resources
- RAM: 200-500 MB (standard), 500-800 MB (with RAG)
- CPU: 10-30% (idle), 50-80% (active)
- Disk: ~100 MB (code), variable (cache/embeddings)
⚠️ Legal Notices
Web Scraping
- ✅ Respects
robots.txt - ✅ Rate limiting (1 req/s default)
- ✅ Identifiable user agent
- ⚠️ Users are responsible for compliance with local laws
Data Privacy
- ✅ All data processed locally
- ✅ No cloud services
- ✅ Full control over logs/cache
- ✅ Session data encrypted (optional)
API Keys
- Brave Search API: brave.com/search/api
- Serper API: serper.dev
🆘 Troubleshooting
Ollama not reachable
# Check status
curl http://127.0.0.1:11434/api/tags

# Start Ollama
ollama serve
Import errors
# Reinstall dependencies
pip install -r requirements.txt

# Or re-run setup
./setup.sh  # or setup.bat
ChromaDB errors
# Delete embeddings
rm -rf data/embeddings/

# Restart
python main.py
API rate limits
# Adjust in config.json
"security": {
  "rate_limit": 2.0  # 2 req/s
}
💬 Support & Community
- 🐛 Issues: GitHub Issues
- 📧 Support: crawllama.support@protonmail.com
- 🔒 Security/Leaks: crawllama.support@protonmail.com (encrypted via Proton Mail)
📝 License
Crawllama License (Non-Commercial) - Free for use and development, but no commercial sale allowed.
✅ Allowed:
- Personal use
- Education & research
- Modification & sharing (non-commercial)
- Contributions to the project
❌ Not Allowed:
- Sale of the software
- Commercial use
- Integration into paid products
See LICENSE for full details.
🙏 Credits
Built with:
- Ollama - Local LLMs
- LangGraph - Agent orchestration
- FastAPI - REST API
- ChromaDB - Vector database
- Rich - Terminal formatting
📚 Further Documentation
- Documentation Overview
- Quickstart & Installation
- QUICKSTART.md – 5-minute quickstart
- INSTALLATION.md – Detailed installation
- Feature Guides
- LANGGRAPH_GUIDE.md – Multi-Hop Reasoning
- OSINT_USAGE.md – OSINT Features
- OSINT_CONTEXT_USAGE.md – OSINT Context Usage
- SOCIAL_INTELLIGENCE.md – Social Intelligence
- PLUGIN_TUTORIAL.md – Plugin Development
- HALLUCINATION_DETECTION.md – Hallucination Detection
- SEARCH_LIMITATIONS.md – Search Limitations
- Health Monitoring
- HEALTH_MONITORING.md – Health System
- HEALTH_DASHBOARD.md – Dashboard Usage
- HEALTH_FEATURES.md – Available Features
- DASHBOARD_STARTER.md – Dashboard Starter
- Maintainer Docs
- RELEASE_PROCESS.md – Release Workflow
- SECRET_LEAK_RESPONSE.md – Secret Leak Response Plan
- PRE_RELEASE_CHECK.md – Pre-Release Checklist
- PROJECT_STRUCTURE.md – Project Structure
Last Updated: 2025-10-27